Today was a pretty productive day in that I got all the lower parts of the table ready for finishing, but my final output didn’t look much different than yesterday.
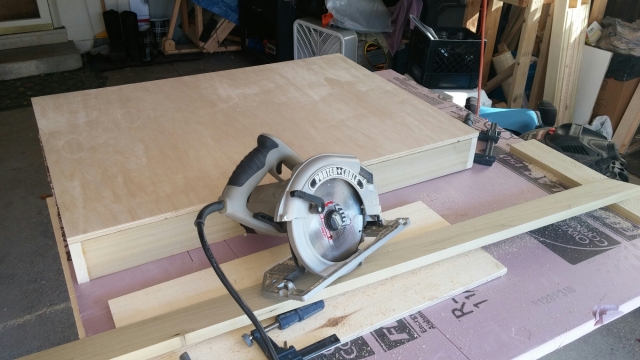
To start, I flipped the completed bottom frame over a piece of 1/2” plywood and traced the outline. I then broke out the circular saw and using a straight piece of poplar plank, figured out the blade offset and clamped the straight edge down. I placed this whole thing on top of a sheet of 1 1/2” thick (I think) foam insulation board that I as a sacrificial cutting surface and made the cuts.
Each time I cut, I told myself how much I needed a table saw. This setup took up most of the second bay in my garage (my wife’s car was gone, otherwise I would have moved mine out into the driveway) and besides all the getting up and down off the floor, making two sets of measurements for each cut and moving clamping the straight edge for each cut took up a lot of time.
In the end, I had a perfectly fit piece of plywood, but man, that was tedious. I fired up the air compressor and hooked up my brad nailer for the first time. Popped in some 1” nails and bam bam bam I had the plywood top glued and nailed in place. A very nice fit for an air tool rookie, if I say so myself! I’ve had this thing in sitting in my cabinet in the garage since last Christmas. I wish I had one a few years ago when I started down this path. Talk about fun!
But it can always be better…I pulled out the jack plane and clamped the base to my makeshift workbench (more plywood over the new sawhorses) and went to town, smoothing up the edges and getting things perfect (my kids are going to come into contact with this thing, I want to make sure it’s not rough on their little hands).
I got some very pretty, thin, poplar shavings!
After the base was as smooth as I could get the edging, I sanded everything with my random orbital sander. Then I turned my attention to the legs. I used an old beater chisel to scrape off the excess glue from last time, then sanded all the edges round and smooth. The final touch on the legs was to clip the corners off the rear of the front legs so (in theory) when we go to move the table, the legs don’t catch on the carpet. Then I sanded everything again just to make sure I didn’t miss any spots.
Everything came out super smooth and after I used the shop vac to suck up the fine dust off the wood, I think they’re ready for finishing. Unfortunately, the timer went off and it was time to get the kids from school. 2 hours in the shop goes by fast, but not today—that sanding seemed to take forever and my arms are still shaking!


